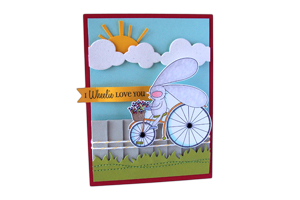
Paper Pleating

by Amy Rohl

Learn the basics of paper pleating.

Supplies

  • One 1 1/2" by 11" piece of cardstock for pleated layer

  • Scor-Pal™, or other scoring tool

  • Adhesive

Step-by-Step

  1. Step 1

    Score the cardstock strip first at the 1" mark, then at the 1 1/2" mark, then at 2 1/2", then at 3", etc. (alternating between adding 1/2" and 1" until you get to the end of the strip).

  2. Step 2

    Add adhesive in the middle of the strip for the pleat to fan at both top and bottom.

    Variation:
    Add a line of adhesive along one edge of your scored strip if you prefer the pleat to fan out at the bottom
  3. Step 3

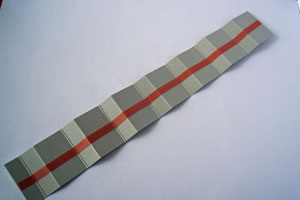
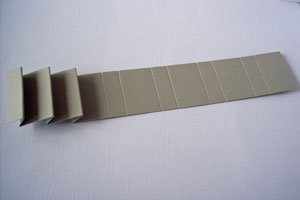
    Accordion fold the strip. Starting with the left side, first make a mountain fold, then a valley fold, and so on, tucking each 1/2" section behind the 1" sections to form the pleats.
  4. Step 4

    Attach pleated layer to cardstock.

    Optional:
    Secure further with baker’s twine or ribbon.

  5. Step 5

    Finish your card.

Video!

Variations

    Change it up
    You can change the width of the strip to make your paper pleated strip wider or more narrow.

    If you need a longer pleated piece , repeat the pleating directions with a second strip, taping the two sections together by adhering two half-inch sections together.

Your Turn

You've seen the tutorial, now you try it! We've got a section of the gallery set aside for Paper Pleating. Try this technique, then upload your artwork to the gallery. Show us your creations!

***Please note - Internet Explorer/Edge is not a supported browser, and will not allow you to see the videos. Please use Chrome, Firefox or Safari to view our tutorial videos.

Questions and Comments

We'd love to get your feedback or questions. Leave your comment below.

Great tutorial I can't wait to try it out.
Sherry Eckblad  |  Wed Jun 15, 2011 at 4:47 AM
Great tutorial. Can't wait to try it!
Debbie Parr  |  Wed Jun 15, 2011 at 4:57 AM
I love it, and I can't wait to get started. The fashion at the moment is to wear a cloth or felt & feather flower on any outfit you wear. A bit of bling and you have such an original piece...AMAZING thanks heaps,Barb.
Barbara Wain  |  Wed Jun 15, 2011 at 4:57 AM
This is awesome! I always wondered how to do this to have it come out even! Thank you!
Anne Schilling  |  Wed Jun 15, 2011 at 5:42 AM
Way cool. I don't have a bicycle stamp, but I'll find something. Many thanks for the adventure.
MH  |  Wed Jun 15, 2011 at 6:39 AM
This is WONDERFUL, Amy & Leigh! You gals outdid yourselves!!! Awesome, awesome job!!!
Carole Burrage  |  Wed Jun 15, 2011 at 7:06 AM
Thanks for the tutorial! Love the card.
Roxann Suits  |  Wed Jun 15, 2011 at 8:06 AM
Love this card but don't see the supply list for colors, stamps, etc. Can you please direct me to the link? I really want to make this.
Emily Z.  |  Wed Jun 15, 2011 at 10:30 AM
Just terrific Amy and Leigh! You've made this so much easier.
alma de la rosa  |  Wed Jun 15, 2011 at 11:22 AM
Hi Emily - the card is in Amy's gallery here: http://www.splitcoaststampers.com/gallery/photo/1992620?&cat=500&ppuser=37423
lydia  |  Wed Jun 15, 2011 at 11:26 AM
Thanks for giving the link to my card, Lydia!
Rohla  |  Wed Jun 15, 2011 at 8:23 PM
Your card looks great. I purchased a scor-pal recently to make stair-step cards, now I can add paper pleating to my list of new skills in 2011. Thank you!!!
susie australia  |  Thu Jun 16, 2011 at 5:36 AM
Super Tutorial! Thank you for taking the time to share it with us! I will surely be trying this!

He IS Able,
Traci S.
Traci S.  |  Thu Jun 16, 2011 at 7:02 AM
Love your simple directions. Will need to give this a go...TFS!
Luanne F  |  Thu Jun 16, 2011 at 7:29 AM
Great tutorial and a very lovely card!!! Thank you for sharing this!!
Linda  |  Thu Jun 16, 2011 at 2:05 PM
Thank you for putting a video and visual written tutorial on here. It helps a great deal!!! ekc
Evette K. Ciampo  |  Sat Jun 18, 2011 at 6:17 AM
Wow! I love this. It's so cute.
I can't wait to try it out!
~Rebecca
Rebecca  |  Sat Jun 18, 2011 at 11:46 AM
How do I attach "bicycle" or other diecut to twine,
so it will move?
Nina  |  Sun Jun 19, 2011 at 11:36 AM
Thanks for the simple lesson!
Elizabeth B.  |  Sun Jun 19, 2011 at 7:37 PM
Great idea, I can't wait to try it out.
Linda Laye  |  Mon Jun 20, 2011 at 12:55 AM

Page 1 of 2 pages  1 2 >

You need to be logged in to comment

GET OUR NEWSLETTER


Splitcoaststampers's privacy policy